Creating filled regions
NOTE: this page is only partially uploaded. Additional content will be added here October 5-7.
Contents
The Big Picture
In Inkscape, it's easy to color in any path region (say, a circle) with the paint-bucket tool (or solid fill in the Fill and Stroke pane). However, it isn't actually that easy for the Eggbot to draw a filled region. The reason is simple: Egg-Bot is a vector printer that draws paths, not a raster printer that draws dots. If you ask it to draw a circle, the pen tip actually moves in a circular path on the surface of the object that you're drawing on. This is like an old pen plotter; it's very different from an inkjet or laser printer, where the entire surface is scanned back and forth.
So, what happens if you ask your Eggbot to draw a filled regions? The Eggbot will simply draw the paths that make up the object, like it always does. The "fill" attributes will be ignored. The net result might be something like this:
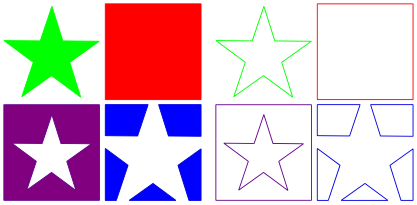
Starting with the filled shapes on the left, the Eggbot will actually just plot their outlines, shown on the right.
So, what can you do it you actually want to fill a region with the pen? Clearly, you need to construct some path that the pen can follow through the entire filled region. There are many possible approaches to this problem-- brute force rastering, adaptive filling algorithms, cross-hatching, and on and on. In what follows, we'll show a few different ways to create such pen paths, what you might call "toolpaths" in machining terms. There are a number of different approaches that work best in different circumstances.
One final word before we get started: Plots where you fill solid regions can potentially take a long time with all that back-and-forth business. Where possible, design around having to fill regions.
Hatch and Inset Methods
These two fill methods can be used to fill closed shapes with pen paths.
Hatch Method
This method is described in detail in our smiley face tutorial.
In short:
- Select a single path
- Open the live path effect editor: Path>Path Effect Editor
- Apply new effect: Hatches (rough) and click "+Add"
- Use the extension to set defaults: Extensions>Eggbot>Preset hatch for fills
- Use the "edit paths by node" tool to set the angle, spacing, and bending of the lines.
You may also need to use the Fill & Stroke panel to set the stroke to be a visible pen and the fill to "none."
This "Hatch" method can handle paths that consist of multiple disjoint regions, for example, a set of stars or non-intersecting circles, but it does not work with "hollow" regions, for example a ring or washer (2D torus) shape.
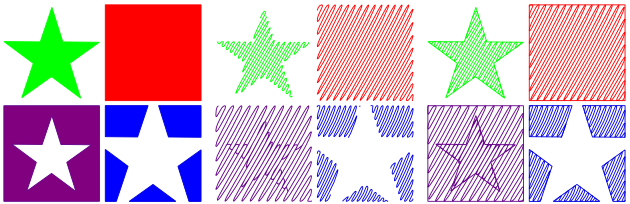
Here are some concrete examples. The four original (filled) shapes are on the left: A star, a square, a square with a star punched out-- essentially a hollow, ring-shaped fill region -- and a smaller square with a star punched out (a set of multiple disjoint regions). In the middle set of four shapes, we've applied the hatch procedure as outlined above. As you can see, it works well on three of the four shapes; but again it does not work on "hollow" areas. (It treats the inner cutout path as a separate path to be filled with hatching.) The set of four shapes on the right have the same hatch applied, but we've also pasted a copy of the original outline shapes on top, to give more definition than you get from the fill alone.
While the hatch method is slightly complicated and does not work in every situation, it is without doubt the best method in any situation where it can be used. It produces excellent results that plot smoothly and efficiently, with preset deceleration at each switchback and an absolute bare minimum of pen lifts. Beyond all that, it's also a "live path effect," which means that it will automatically reflow as you change the shape of the filled region, and you can even remove the hatch at any time to restore your original object.
Inset Method
So what can you do when you need to draw "hollow" filled shapes that the hatch method fails for? For example, what if you're drawing a US flag on an egg, and with the blue pen, you want to draw the filled blue area around those blue stars. For cases like these, we use the "inset" method, which has its own advantages and disadvantages.
- Select one or more path objects.
- If the object is filled, set the fill to "None," leaving you with just the outline visible.
- (Optional) Open the Inkscape Preferences dialog, scroll to the "steps" pane, and set the "Inset/Outset by:" interval. (A value of 3 px is usually a good starting point.) Close the dialog.
- Repeat the following sequence:
- Duplicate the objects with Ctrl-D (or, Edit>Duplicate)
- Inset the paths with Ctrl-( (or, Path>Inset)
- As you perform that sequence, it will create inset paths that are smaller and smaller until they go away altogether.
Here's how it looks in practice:
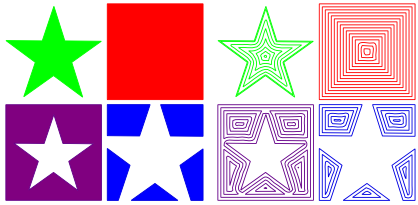
Advantages: Can be applied to more than one object at once. Handles complex geometry.
Disadvantages: Tedious to apply. Generates concentric paths that are not connected-- the pen must lift and lower between drawing any two inset shapes. Concentric paths cannot be adjusted in shape or space after being generated. Occasionally, if the inset shape becomes too complicated, the inset operation can fail. (The un-insettable path can usually be fixed by using the Path>Simplify command.)
Using Hatch and Inset together
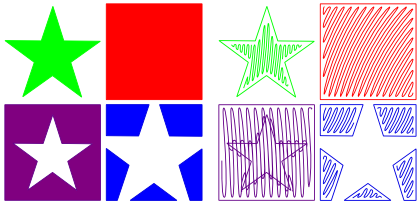
For non-hollow shapes where the hatch method works, it's often helpful to perform a single Inset operation before applying the hatch. The result is shown above: The hatch marks do not go all the way to the edge of the filled region. Using an initial inset like this is often a good way to compensate for pen width when filling a region.
Interpolation and stitch methods
Here are two more methods for creating regions filled up by paths in Inkscape. These methods are different from those above, in that they are not usually applicable for filling closed shapes. Instead as you will see, they can be used to fill up the area between two given paths-- something that could come in handy in a variety of circumstances.
Interpolation
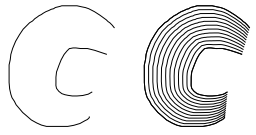
Suppose that we start with the two curves shown on the left. The interpolation method produces a series of curves between the two shapes, that can be used to fill in the region.
- Select the two curves
- Select Extensions> Generate from path>Interpolate...
- Select the number of intermediate curves and click 'Apply.'
While you can't always see it, paths in Inkscape have distinct orientation, with "start" and "end" points. The smooth result that you see above will only work if both paths are going the same direction-- for example, if you drew both of them with downward pen strokes. If necessary, you can use the Path>Reverse command to reverse the direction of one of the paths.
You can also read more about the Interpolate function in this tutorial.
Stitch Paths
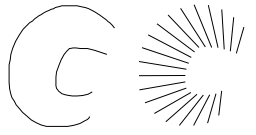
Here, we've started with the same two curves that we used previously. The Stitch Paths method produces not a series of lines parallel to our initial paths, but a set of lines perpendicular to them.
- Select the two curves
- Select Path>Combine, which turns these two curves into a single path object
- Open the live path effect editor: Path>Path Effect Editor
- Apply new effect: Stitch sub-paths
- In the path effect editor pane, select the number of curves shown.
You can also read more about the Stitch sub-paths function in this tutorial.