Eggbot Control

<<< The Eggbot Extensions || Eggbot Control || Preset hatch for fills >>>
Introduction
The Eggbot Control extension is the main Eggbot extension. This is the tool to use when you are ready to "print" your drawing on your Eggbot. It is your plotting "control panel". In addition to plotting, you will also use it to adjust settings for your Eggbot. For example, to control how high to raise or lower the drawing pen.
The Eggbot Control extension presently has eight tabs, each of which is described in its own section below. When opening the Eggbot Control extension the first time after launching Inkscape, the selected tab will always be the "Plot" tab. However, during a working session, Inkscape remembers which tab you last selected and will automatically select that tab upon re-opening the extension.
Values which you specify in the various tabs and set with the "Apply" button will be saved by Inkscape along with your other Inkscape preference settings. You do not need to set these values each and every time you run Inkscape.
Plot

The function of this tab is straightforward: send your Inkscape drawing to your Eggbot. Simply click the "Apply" button, and plotting will begin (assuming, of course, that your Eggbot is powered up and connected via USB to your computer). If you wish to close the extension, click the "Close" button. To select another tab, just click on the desired tab.
Once you've adjusted the Eggbot control values with the other tabs, you will mostly use this tab and the "Setup" tab in order to load and unload eggs and then draw your plots.
If you wish to plot only a portion of your drawing, consider using the "Layers" tab. To resume a paused plot, use the "Resume" tab.
Setup
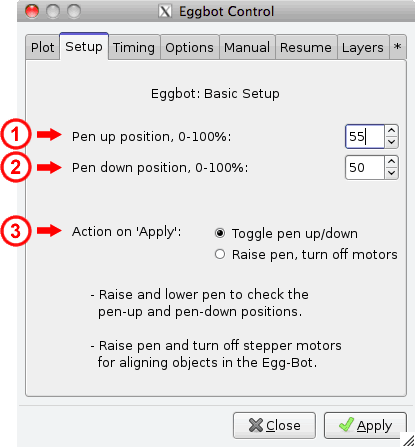
The "Setup" tab is used for two stages of setup. First, for setting up the proper pen up and down stops for the objects you will be drawing on. Then, as you set each object up in the Eggbot frame and subsequently unload it, you will again want to use this tab to raise the pen and disengage the motors. (Having the motors disengaged makes it easier to align the object for precise drawing.) Often, you can leave the pen stops unchanged until you switch to a new object whose size or shape is significantly different from what you were drawing on previously
To draw on an object, the Eggbot places the pen in a down position (down stop) and then rotates the egg or moves the pen or a combination of the two. When a section of the drawing is finished and the pen needs to be repositioned without actually drawing, the pen is raised into an up position (up stop). The act of raising the pen is a "pen up" operation; the act of lowering the pen is a "pen down" operation. The physical raising and lowering of the pen is accomplished with the pen lift motor -- a servo -- whose arm (horn) lifts or lowers the distal pen arm. This servo arm has about 180 degrees of travel with 0 degrees corresponding to pointing down vertically and 180 degrees pointing up vertically. The Eggbot Control sets the pen up and pen down positions as a percentage of this range of travel. So, assuming that the servo arm is attached such that it is horizontal when the servo is driven to 90 degrees, then a pen position of 0% corresponds to vertical down (0 degrees), 50% to horizontal (90 degrees), and 100% to vertical up (180 degrees). Odds are, however, that when you attached your servo arm (horn) to the servo motor, it did not end up that such that it is dead on horizontal when the servo is driven to 90 degrees. In that case, the relationship between percentages will be offset by some constant angle. For instance, 50% may correspond to 10 degrees below horizontal. Thus, you may find yourself using percentages that don't fit the description of 50% equals horizontal. That's fine. Or, if you want, you can reposition the servo's arm to give better agreement with 50% being horizontal.
- The pen's up position as a percentage of the servo's full range of travel (about 180 degrees), is set in the "Pen up position" field. You can manually enter the desired value in the input box or click on the up or down controls to increment or decrement the value. If you change this value, your change will not take effect until you click the "Apply" button. You will want to set the pen up position to be a value larger than the pen down position.
- The pen's down position as a percentage of the servo's full range of travel (about 180 degrees), is set in the "Pen down position" field. You can manually enter the desired value in the input box or click on the up or down controls to increment or decrement the value. If you change this value, your change will not take effect until you click the "Apply" button. You will want to set the pen down position to be a value smaller than the pen up position.
- Use this item to select whether to toggle the pen's position or raise the pen & disengage the motors when the "Apply" button is clicked.
After you have set the desired values, click the "Apply" button. To cancel your changes, click the "Close" button.
Timing

The "Timing" tab controls how fast the Eggbot's motors and pen arm servo operate. Getting these speeds set to reasonable values will enhance the quality of your plots. Here reasonable means that they are not so fast that slippage or pen skipping occurs, but not so slow that plotting takes too long to be fun to watch. And, you do not want to drop the pen too fast; otherwise, it may damage the pen tip, make the start of a line slightly wider, or cause the pen to bounce and miss part of the drawing (see item 9).
As regards plot quality, pay particular attention to items 4, 8, and 9 below. Item 5 is also significant but not as important as 4, 8, and 9.
- The "Speed when pen is down" setting controls the maximum number of motor steps per second which may be taken by either or both stepper motors. (Recall that the egg's circumference has 3,200 steps and the pole-to-pole distance is 1,000 steps.) The default value of 300 steps per second is a fairly good choice. If you want to get a quick sketch out as a "draft", go ahead and use a faster value. Also, to get a feel for the effect of different speeds, try comparing a plot at 250 or 200 steps per second with one at 300 or 400. Peck plotting and engraving require much slower speeds than those used for drawing with an ink pen.
- The "Speed when pen is up" value controls the maximum speed at which either or both stepper motors can operate while moving the raised pen between locations over the drawing surface. You can use much larger values than the pen down speed without compromising the quality of your plots. However, allowing the speed to be too high may introduce slippage as the egg is rotated.
- To control how fast the pen is raised, change the "Pen raising speed" value. This value controls how many percentage points the pen is raised per second. If the pen's down position is D percent and its up position is U percent, then the time it takes to raise it will be (U - D) / R where R is the pen up rate as percentage units per second. A reasonable target is to have the pen raised in well under half a second. (And yes, it would make more sense for this field to be "how many tenths of seconds to take to raise the pen" and let the computer do the math for you.)
- As the pen is raised, the Eggbot will pause before initiating another operation such as rotating the egg. The time to wait is specified in units of milliseconds (ms). There are one thousand milliseconds in a second (e.g., 200 ms is 0.2 s).
Technical note: The delay starts at the beginning of the pen's upward movement, not at the ending, so you may wish to compute the time that it takes the pen to move up. For example, let's say we have a pen up position U of 68, a pen down position D of 62, a pen raising speed R of 50, and want a 200 ms delay after the pen gets all the way up. Referring to item 6, we see we have (U - D) / R = (68-62)/50 = 6/50 = 0.12 seconds = 120 ms before the pen gets up. Adding the 200 ms pause we want, means we must actually set this value to 320.
- With the "Pen lowering speed" timing, the rate at which the pen is lowered towards your egg is controlled. It is important to not drop the pen (i.e., lower it too fast). Also, keep in mind that the Eggbot does not sense when the pen has made contact with your drawing surface: the Eggbot simply lowers the pen until the up/down servo has reached the proper setting (item 2 of the "Setup" tab). Like the "Pen raising speed", the "Pen lowering speed" is expressed as the number of percentage points to move the servo arm per second. If the pen's down position is D percent and its up position is U percent, then the time it takes to lower the pen will be (U - D) / r where r is the pen down rate in percentage units per second. Lowering the pen in half a second or a bit longer is reasonable.
- After the pen has been lowered, it is important to wait a fraction of a second before starting to draw again. This gives the pen arm a chance to settle in and recover from any minor bouncing. If you start to draw too soon after lowering the pen, there can be some skipping of the pen tip. To control the length of this pause, the "Delay after lowering pen" value is used. This value has units of milliseconds (ms) where 1 second is 1000 milliseconds. This delay should probably be no less than a quarter second (250 ms) and values as large as half a second (500 ms) are not unreasonable.
Technical note: As with raising the pen, the delay starts at the beginning, not at the ending, of the pen's downward movement. You may wish to compute the time that it takes the pen to move down. For example, let's say we have a pen up position U of 68, a pen down position D of 62, a pen lowering speed r of 20, and want a 250 ms delay after the pen gets all the way down. Referring to item 8, we see we have (U - D) / r = (68-62)/20 = 6/20 = 0.3 seconds = 300 ms before the pen gets down. Adding the 250 ms pause we want for settling, means we should actually set this value to 550.
Options

A number of plotting related options are set with the "Options" tab. Most of these options need only be set once and then forgotten. They do not vary as you change your drawing media. Remember that any changes you make will not take effect until you click the "Apply" button.
One important option for owners of the 2009 clear acrylic "Classic" Eggbot is that described in item 11 below. Later versions of the EBB firmware reversed the direction of the egg motor to support the relocation of the pen arm in the 2010 Eggbot kits. Consequently, Eggbot "Classic" owners should check the "Reverse motion of Motor 2 (egg)" check box.
- Normally, the top of your Inkscape drawing will be drawn towards the headstock end of your Eggbot. By checking this box, the motion of the pen arm is reversed, causing the top of your Inkscape drawing to be drawn towards the tailstock end of your Eggbot.
- Normally, a line moving horizontally from left to right in your Inkscape drawing will be plotted on your egg by rotating the egg counterclockwise when viewed from the tailstock end of the Eggbot. This action causes the line to progress from left to right across your egg. To reverse this action, check the "Reverse motion of Motor 2" check box.
Owners of "Classic" Eggbots -- clear acrylic Eggbot "beta" units from 2009 -- should check this box. - Had difficulty drawing within the lines when you were a child? Still do? Not a problem! By checking this box, the Eggbot will "wrap" long lines by just continuing to rotate the egg in the appropriate direction. This is especially helpful for drawing patterns on your eggs which look similar to tessellations. The "Eggmazing" extension assumes that you have checked this box.
- When checked, the "Start with pen centered" option tells the Eggbot that when you start your plot, the pen is resting at the center of your Inkscape drawing page. For example, if your Inkscape drawing page has a width of 3200 pixels and a height of 800 pixels, then the pen is assumed to be resting at the (x, y) point (1600, 400). The extension will automatically compute the center based upon your drawing's page dimensions. Note that this is a change in behavior from v2.0 of the Eggbot Control extension [1].
- After finishing a plot, the Eggbot will position the pen back to the plot's starting position if the "Return to home when done" checkbox is checked.
- If you have purchased or built an engraving attachment for use with your Eggbot, then use this option to enable the engraver while plotting. Note that when this option is selected, the engraver will be turned on and left running throughout the plot and only turned off when the plot is finished. The engraver is not turned off each time the pen arm is lifted. Use of this option requires version 2.2.0 or later of the Eggbot Control extension. Click here if you need help determining which version you have installed.
- Fundamentally, the Eggbot only draws straight line segments. When presented with a circle, arc, or cubic spline to draw, the Eggbot approximates the smooth curve with many short line segments that follow the path of the curve. This approximation can be made to appear smoother by drawing even more, shorter line segments. Or, it can be made rougher be drawing fewer, longer line segments. The degree of smoothness is controlled with this option. The smaller the value specified, the smoother the approximation will appear and the longer it will take to draw. The default value of 0.2 is generally an acceptable value.
Manual

The "Manual" tab is so named as it allows you to manually send select, basic commands to the Eggbot. With the exception of the "Check EBB Version" command, these commands are intended to aid in fine tuning your Eggbot's setup for an egg or other object you are about to draw on. To some extent this tuning function of this tab has been supplanted by the "Setup" tab, but not entirely.
In general, you will want to select the operation to perform with the "Command" drop-down list, and then click the "Apply" button. For the two motor walking commands, you can also specify the number of steps to turn the motor forward (+) or backwards (-).
- Use the pull-down selection menu to the right to choose the command to send when the "Apply" button is clicked. The possible commands are:
Raise the Pen Lift the pen to the pen up position. This is useful when loading or unloading an egg. Lower the Pen Lower the pen to the pen down position. Walk Motor 2 (egg) Rotate the egg forward or backwards the number of steps specified in the "Walk distance" field. Positive and negative distances are allowed. A negative value gives the opposite direction of rotation from that of a positive value. If the pen is down when this operation is performed, then a circumferential line will be drawn. You may wish to use this command when attempting to precisely register the pen tip's position on the drawing surface. Note that the motor will automatically be engaged if necessary. Walk Motor 1 (pen) Move the pen arm longitudinally forward or backwards the number of steps specified in the "Walk distance" field. Positive and negative distances are allowed. A negative value gives the opposite direction of motion from that of a positive value. If the pen is down when this operation is performed, then a segment of a line of longitude will be drawn. You may wish to use this command when attempting to precisely register the pen tip's position on the drawing surface. The motor will automatically be engaged if necessary. Enable Motors Engage the Eggbot's motors. Disable Motors Disengage the Eggbot's motors. This is useful when loading or unloading an egg. Engraver On Turn the engraver motor on. Requires an engraving attachment as well as version 2.2.0 or later of the Eggbot Control extension. Engraver Off Turn the engraver motor off. Requires an engraving attachment as well as version 2.2.0 or later of the Eggbot Control extension. Check EBB Version Inquire of the Eggbot its firmware version. Use this command before and after upgrading the Eggbot's firmware. - When walking either motor, you can specify the number of steps to rotate the motor by. Use a positive integer value to rotate the motor forward, while a negative integer value will rotate it backwards. Remember that for the egg motor, motor 2, there are 3,200 steps in a full rotation. For the pen motor, motor 1, there are also 3,200 steps in a full rotation-- or rather, there would be if it could travel in a full circle. The travel of the pen arm is, however, constrained by the Eggbot chassis and the typical travel range is 800-1000 steps between the two polar regions. The actual range depends on the exact configuration of the Eggbot and what it's plotting on. Object size, pen type, and chassis configuration will all affect pen-arm travel.
Resume

The Eggbot has a useful feature which allows you to pause and resume your plots. By pressing the PRG button on the Eggbot's EBB (EiBotBoard), plotting is paused. You can then make adjustments including changing drawing speeds and pen up or down positions. After making any adjustments, you can resume the plot by clicking the "Apply" button on this tab. Note that you can even exit Inkscape. The Eggbot Control extension will automatically store plotting information in your drawing file. So, if you save the drawing file before exiting Inkscape, you can later resume your plot by relaunching Inkscape and re-opening your drawing.
- Check the "Cancel and return home only" box if you wish to cancel the plot after pressing the PRG button on the EBB board.
Layers

By default, the Eggbot Control extension will plot your entire drawing. However, if you divide your drawing into separate Inkscape layers, you can then plot each layer or groups of layers in distinct plotting runs. This makes it easy to plot drawings with multiple colors by separating each color into its own layer. Load the pen for the first color, then plot that layer. When that layer is finished, change the pen to the next color and plot that layer. The only requirement to using this feature is that you begin each layer name with an integer in the range 0 through 100. For example, if you have three layers with the names,
- 1 - Red swirls
- 1 - Red zig zags
- 2 - Blue circles
Then you can plot the two red layers with a red pen by specifying "1" in the "Plot only layers beginning with" field. You can then change the pen to blue and plot the blue layer by specifying "2" in that field. Click the "Apply" button each time to begin plotting of the selected layers.
- Plot only the layers whose name begins with the indicated number. Any integer in the range 1 through 100, inclusive, is allowed.
*

This final tab is the Eggbot Control's "About" page and shows the version of the extension which you currently have installed. Also, it lists any known requirements, limitations or problems with the extension.
Notes
1. When using the "Start with pen centered" option, v2.0 and earlier of the Eggbot Control extension assumed that at the start of a plot the pen was resting along the line y=500. This was a historical assumption based upon a drawing page with dimensions 3200 by 1000 pixels.
<<< The Eggbot Extensions || Eggbot Control || Preset hatch for fills >>>