Difference between revisions of "Eggbot Quality Troubleshooting"
| Line 33: | Line 33: | ||
=== Dry pen === | === Dry pen === | ||
http://shop.emscdn.com/wiki/eggbot/quality/3A.jpg | http://shop.emscdn.com/wiki/eggbot/quality/3A.jpg | ||
| + | |||
| + | A common error that tends to happen when using old pens, or pens that have been left un-capped. It is easy to fix this problem by taking a scratch piece of paper and, right before you start your EggBot, bleeding your pen a little on the paper to get the ink flowing again. | ||
| + | |||
| + | http://shop.emscdn.com/wiki/eggbot/quality/1F-2.jpg | ||
=== Alignment of the egg in the egg cups === | === Alignment of the egg in the egg cups === | ||
| Line 66: | Line 70: | ||
http://shop.emscdn.com/wiki/eggbot/quality/21A.jpg | http://shop.emscdn.com/wiki/eggbot/quality/21A.jpg | ||
| + | |||
| + | ===Distortion=== | ||
| + | http://shop.emscdn.com/wiki/eggbot/quality/22A.jpg | ||
| + | |||
| + | http://shop.emscdn.com/wiki/eggbot/quality/24A.jpg | ||
| Line 73: | Line 82: | ||
=== Motor reversal issues === | === Motor reversal issues === | ||
| + | http://shop.emscdn.com/wiki/eggbot/quality/5A.jpg | ||
| + | |||
| + | http://shop.emscdn.com/wiki/eggbot/quality/6A.jpg | ||
=== Timing issues === | === Timing issues === | ||
| + | http://shop.emscdn.com/wiki/eggbot/quality/2A.jpg | ||
| + | |||
| + | http://shop.emscdn.com/wiki/eggbot/quality/4A.jpg | ||
| + | |||
| + | http://shop.emscdn.com/wiki/eggbot/quality/7A.jpg | ||
| + | |||
| + | http://shop.emscdn.com/wiki/eggbot/quality/8A.jpg | ||
Revision as of 11:43, 11 July 2014
If you are having quality issues with your prints that might be due to a misalignment of some sort, we hope that this guide will help you to find the source of the problem. This guide contains some helpful pictures that show how configuring the EggBot in different ways can produce different outcomes.
Contents
"Hardware" issues
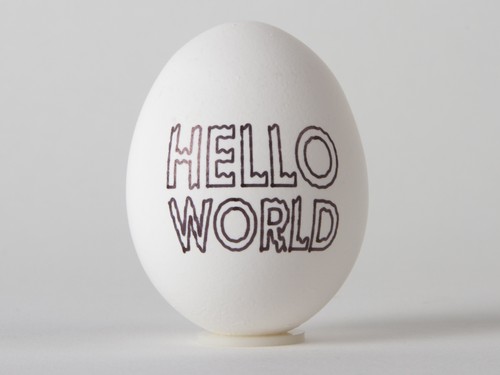
Our test file

This is the test file that we'll be using for our examples. Note that the print quality is fine and consistent. The "O's" have closed shapes, the vertical parts are vertical, the horizontal parts are horizontal, the slants of the "W's" have consistent width, and so forth. (Some of the examples that we'll show later do not have these properties!)
You can download the example file here. (TODO: ADD LINK)
This was printed with the Deluxe EggBot on a chicken egg with an Ultra Fine Point Sharpie. The egg was oriented with its "fat" side pointing towards the egg motor (headstock).
The print settings were as follows:
- Timing tab:
- Speed when pen is down: 300 steps/s
- Speed when pen is up: 400 steps/s
- Pen raising speed: 50 %/s
- Delay after raising pen: 200 ms
- Pen lowering speed: 20 %/s
- Delay after lowering pen: 400 ms
- Options tab:
- Reverse motion of Motor 1 (pen): checked
- Reverse motion of Motor 2 (egg): checked
- Egg (x) axis wraps around: checked
- Start with pen centered: checked
- Return home when done: checked
- Enable engraver, if attached: unchecked
- Curve smoothing (lower for more): 0.2
Dry pen

A common error that tends to happen when using old pens, or pens that have been left un-capped. It is easy to fix this problem by taking a scratch piece of paper and, right before you start your EggBot, bleeding your pen a little on the paper to get the ink flowing again.

Alignment of the egg in the egg cups

Loose screws


Vertical position of the pen motor


Headstock / Tailstock position


Pen arm not flat when in the down position

Pen arm backer position


Bumping the pen arm


Distortion


"Software" issues
Motor reversal issues


Timing issues