RoboPaint

Contents
Overview[edit]
There are three main software interfaces for driving the WaterColorBot: RoboPaint (as described on this page), the real-time painting app RoboPaint RT, and the WaterColorBot extensions for Inkscape.
RoboPaint is the Automatic Painting Software for the WaterColorBot. It runs under Mac, Windows, and Linux. In RoboPaint, you can open existing artwork in SVG format, snap the colors to your paint palette, and paint the document. It also has a rudimentary edit mode that lets you create new drawings to print.
If you’re starting with existing SVG artwork, RoboPaint is generally the best of the WaterColorBot interfaces to use for a few different reasons. Most importantly, it’s good at automatically filling in large solid regions of a painting.
We recommend that all WaterColorBot users download and install RoboPaint.
Windows users should download and install RoboPaint prior to the other programs, as it also installs the WaterColorBot’s USB driver.
Getting RoboPaint[edit]
RoboPaint runs on Mac, Windows, and Linux.
Download and install the latest version from the releases page.
Note for Mac users: There are two different versions of RoboPaint available, one for MacOS 10.7 and newer, and one specific for MacOS 10.6. New releases (past September 2014) will support MacOS 10.7 and newer.
Using RoboPaint[edit]
Launching RoboPaint[edit]
RoboPaint is a stand-alone application that you open in the normal way, and can be run whether or not your computer is connected to the WaterColorBot.
If you are planning to make paintings in a given session with RoboPaint, we suggest that you take the following three actions before opening RoboPaint:
- Move the carriage to the upper left (Home/START) corner,
- Plug in the power supply (both to the WaterColorBot and to power), and
- Plug in the USB cable (both to the WaterColorBot and to your computer)
The Home Screen[edit]

When you first open RoboPaint you will likely be greeted by this welcoming screen. If RoboPaint has managed to find and connect to your WaterColorBot, you may also see a message flash by quickly ("Port found, connecting... Connected!") as it says "hello" to the WaterColorBot.
If you can't connect to the WaterColorBot[edit]

If RoboPaint cannot find your WaterColorBot, you will see a slightly less welcoming message: "Couldn't connect! - Port not found. What do you want to do?"
You will get this message when the WaterColorBot is not connected to your computer by USB, or when your computer is already using the USB port. (For example, if RoboPaint RT is already talking to your WaterColorBot.) If trouble persists, please see our troubleshooting guide for additional assistance.
When the WaterColorBot is unable to connect, you will have a choice presented, to either "Continue in Simulation mode" or "Try to Reconnect." If you choose simulation mode, RoboPaint pretends that it has a valid connection to the WaterColorBot. You can use this mode for opening, creating, and preparing files, or to try out the whole WaterColorBot process when you do not have the machine handy.
Choices from the Home Screen[edit]


There are two main options presented on the Home Screen: Create and Print.
- In Create mode, you can open, resize, and edit existing vector artwork. You can also make new drawings to print out on the WaterColorBot.
- In Print mode, you actually operate the WaterColorBot to paint your drawing.
Most commonly, one begins in Create mode (for example, to open and prepare a file), and then switches over to Print mode when ready.
Please note that the home page in RoboPaint 2.0.0 is slightly rearranged, with additional modes available.
Create Mode[edit]

Here is what it looks like when you first enter Create mode: A blank canvas, with a basic set of tools and commands.
Opening Files[edit]

From the File menu, you can create a new document to paint, or open an existing SVG drawing.
Aside: We generally recommend http://inkscape.org Inkscape] as a great place to create SVG documents for use with the WaterColorBot. Inkscape is a free program that can import artwork in many vector graphics formats including PDF. It is excellent for creating new artwork as well. The WaterColorBot does not (directly) paint bitmap pictures (e.g., JPG, PNG, BMP files), but the tracing functions in Inkscape are one approach towards converting pictures into paintings.

You can also open one of several included sample files, to test out the process. (The "Earth" and "Tree" examples are two of our favorites.)
Preparing a file to print[edit]

Once you have opened a file, you normally need to do some simple prep work to prepare it for printing.
We suggest the following two steps, in most cases:
- Click the "Fit Content" button to resize your drawing to fill the available print area of the WaterColortBot, and
- Click the "Auto Color" button to "snap" all of the colors in your drawing to those of the paint palette, giving you a preview of how it will print.
Other controls available in Create mode allow you to:
- Add new shapes (with the various controls on the left-hand side)
- Group and ungroup elements (from the Object menu)
- Pick fill colors and line colors ("stroke" colors) from the paint palette
- Arrange objects in front of and behind other objects (from the Object menu)
- Fill objects with a given color, by selecting them and then clicking a color on the palette
Moving to Print mode[edit]

When you are ready, switch over to Print mode to paint your drawing.
Note: When switching to paint mode, you may be presented with a dialog box prompting you to save before "quitting" create mode. It is only possible to open and save files from within Create mode, so we recommend that you save your file before moving to print mode.
Print Mode[edit]

In Print mode, you have a simpler set of controls: The big "Start" button that begins painting, and three other buttons:
- Raise/Lower brush. Use this to check and adjust the position of the brush in the brush holder, or if you should need to raise the brush for any other reason.
- Park Home. The WaterColorBot carriage needs to be in the upper-left (START) corner before you start a new painting. If the WaterColorBot moved its carriage elsewhere and you would like to to go back home, click this button.
- Unlock motors. This command disengages the WaterColorBot's motors so that you can move the carriage by hand.
Pausing and resuming[edit]

While painting, the Start Button turns into a "Pause" button. If you click the "Pause" button, the painting will halt, and the top button now reads "Resume"; you can use it to resume your painting.
Status messages[edit]
You may also notice that the lower part of the controls indicates the status of the WaterColorBot:


Here are some example status messages that you may see while the WaterColorBot is painting.
Returning to Create mode[edit]

You can also return to Create mode by clicking the symbol in the toolbar.
Other Modes[edit]
Spiral Paint[edit]
Spiral paint is a mode which takes the input of an image file and creates a spiral path of varying width which produces the image. This mode works best with markers and pens with variable width depending on pressure because they can paint the spiral in a continuous line.
Here's a video tutorial on how to use this feature: https://www.youtube.com/watch?v=IJ6QPAJYD50
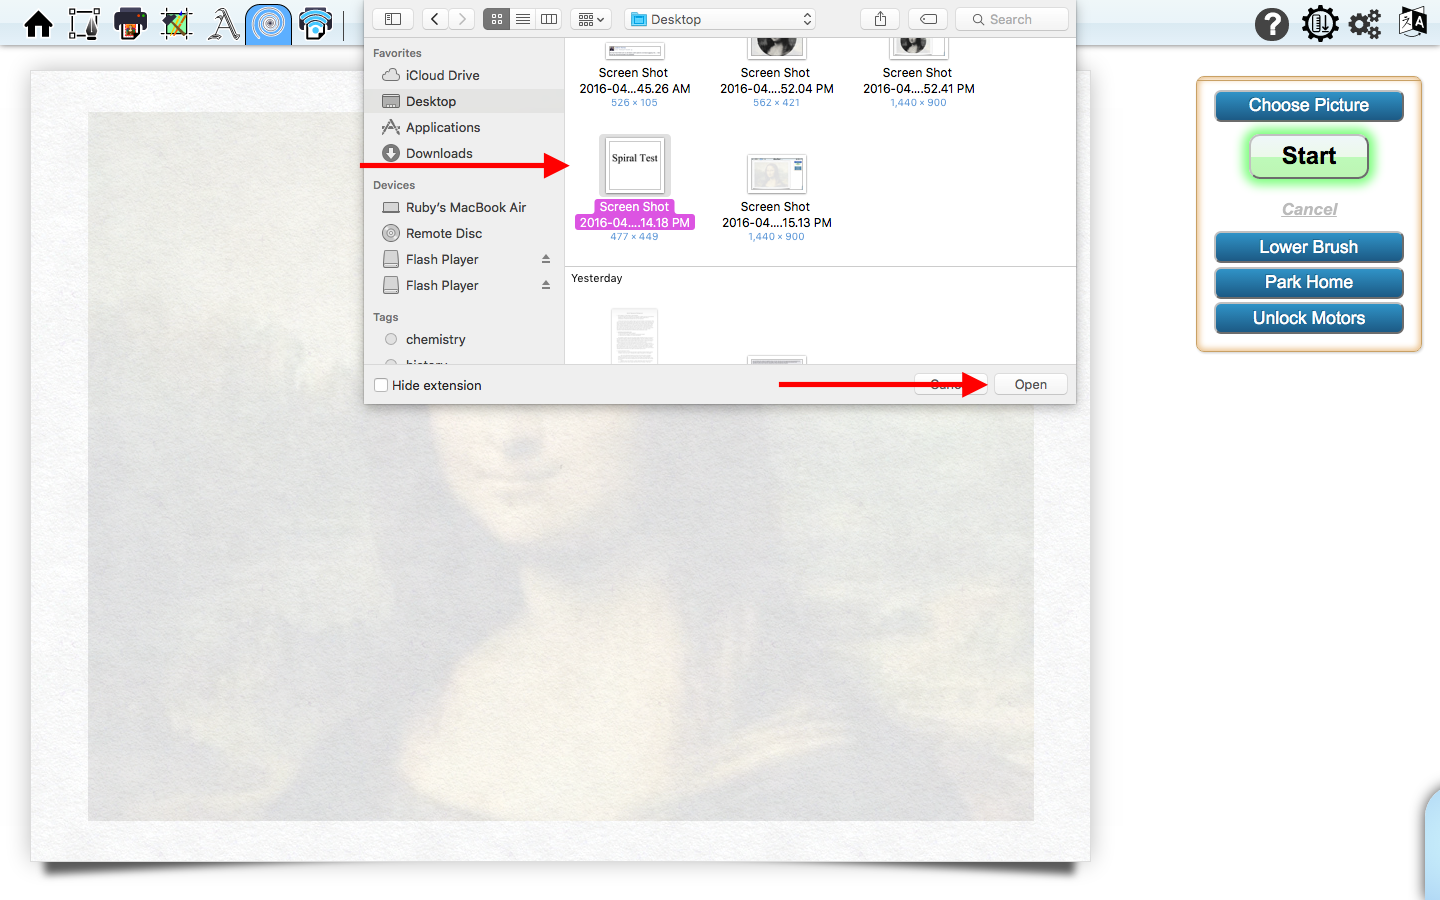
Click "Choose Image" to import an image from your computer.

Supported image formats are PNG, GIF, and JPG.
You will see a spiral generating on the screen. Once it is finished, press "Start."
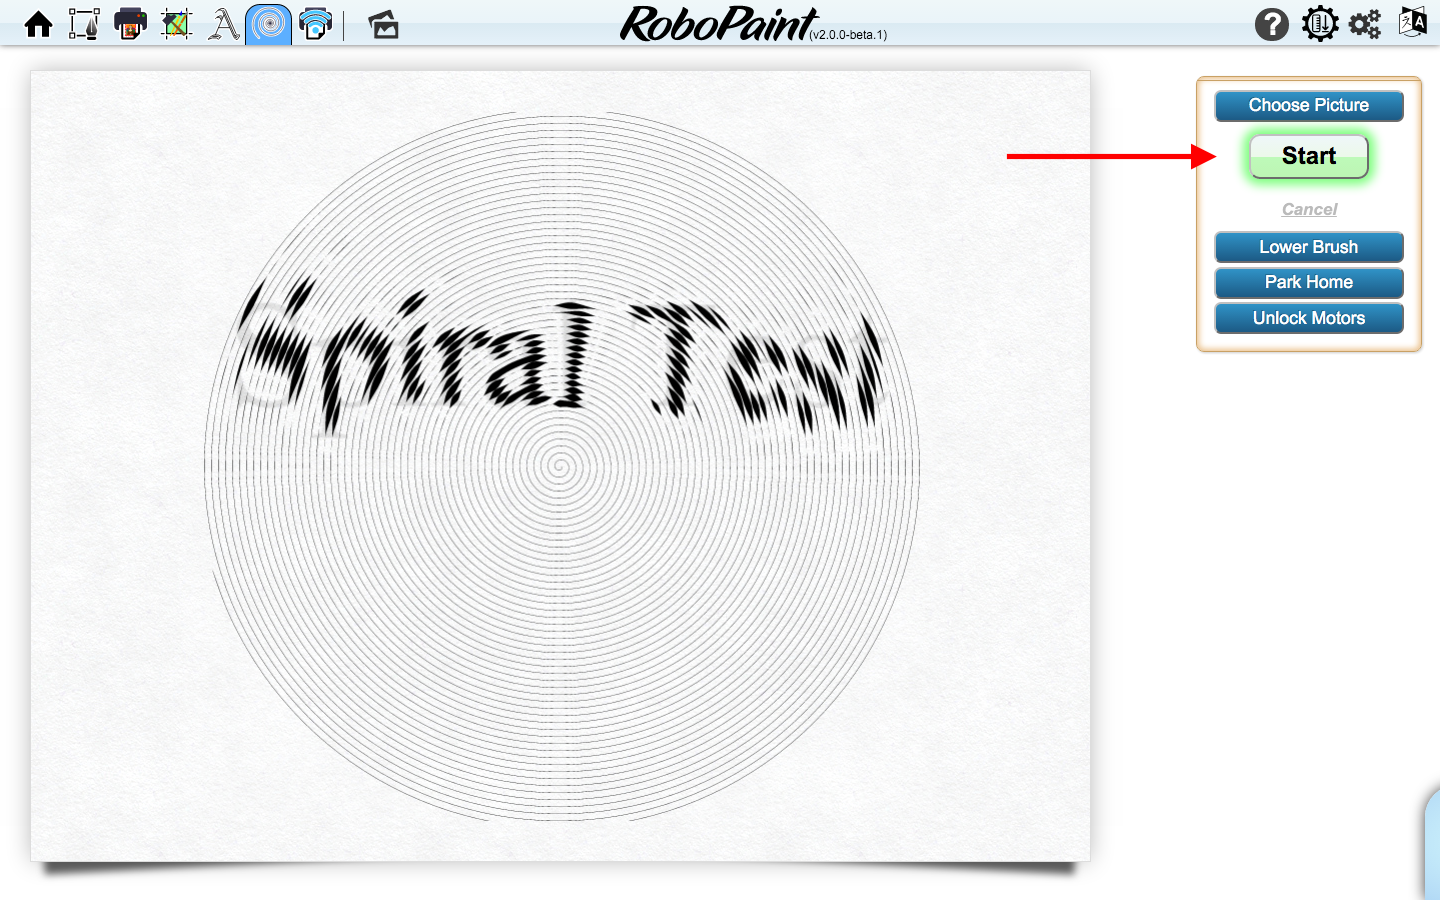
Then, it will start painting your spiral!

Custom Image Print[edit]
This mode allows fine tuning of the pathways with which the WaterColorBot paints an image by allowing the user to choose what part of the image the robot paints and which fill it uses after each step.
Print of Save Text[edit]
This mode allows the user to type in text of their choice and modify the style and format of it before saving it or printing it.
Remote Print[edit]
This mode allows RoboPaint to communicate remotely with external applications that are designed for working with the WaterColorBot.
Settings[edit]

To access the RoboPaint settings dialog, click the "gears" logo in the upper right corner of the screen. Settings are available from the home screen, and from both Print mode and Create mode.
Changes made to the settings in RoboPaint only affect the behavior of the WaterColorBot when operated from RoboPaint. They do not affect the operation of either RoboPaint RT or the Inkscape extensions.

There are three tabs within the Settings dialog, and we will go through their contents in detail. The first tab is is "Painting Style," which contains the most frequently changed controls and settings.
Painting Style Tab[edit]

The first control is for the Carriage Movement Speed: That is, how fast does the carriage go? Slower speeds tend to be a little more accurate and reliable, but, well, take longer.
The WaterColorBot can go both slower and faster than humans tend to paint, but pens and paintbrushes are designed to operate at human painting speed, so you may want to take that into account. We tend to like settings in the range of 75% or so-- a little bit faster than a human normally paints.

The next set of controls are for:
- Painting/Drawing mode, to select how the WaterColorBot behaves in general. More about that in a moment.
- Showing color names on the paint palette
- Installed Paint set, providing an option for other other arrangements of paint colors.

The available Painting/Drawing modes are:
- Default (Brush, Water & Paint)-- standard watercolor painting mode
- Water Only (No Paint: Buddha Board) -- for use with water-painting boards
- Paint Only (No Water: Non-watercolros) -- for use with (for example) tempera paints
- No Water or Paint (Pen/Pencil mode) -- for sketching, do not dip the pencil in paint or water.

The options for Installed Paint Set are:
- Crayola Classic -- the set included in Crayola 8-pan sets
- Crayola Alternate -- the other set included in Crayola 16-pan sets
- Prang Glitter -- for the Prang brand 8-pan glitter watercolor paint set
Most commonly, we stick with the default option "Crayola Classic." (We may add more options to this menu in the future, as well.)

The next set of options:
- Refill Distance: How far the brush travels before going back to get more paint
- Stroke precision: How accurately the WaterColorBot will trace paths
- Stroke overshoot: How much to compensate for the bending of the paint brush

Finally, there are settings for the type of fill used for filling solid regions with paint:
- Type: What kind of fill is used
- Fill Precision
- An option to connect small gaps -- almost always a good idea to leave enabled
- Options for the angle and spacing of line and hatch fills

The options for Fill Type are:
- Straight line
- Triangle line
- Sine line -- wavy -- Good for painting water!
- Center spiral -- big circles look good when painting wood
- TSP squiggle -- efficient random-looking fills that tend to look a bit messy, for better or worse.
Basic Setup Tab[edit]

The basic setup options allow you to change the set height for the Brush-Up, Brush-Down (for painting) and Brush-Down (for washing the brush) positions. You can also change how long is allowed for the brush to move between these positions.
As you drag the sliders, the WaterColorBot will follow along, and you can use this to fine-tune the positions. Take care that if you go to far, the brush-lift servo motor will strain under the load. (The motor should be relatively quiet when at rest.)
Advanced Tab[edit]

The Advanced tab contains less-frequently used options:
- Invert X or Y stepper: In case one of your motors is wired backwards
- Buffer smoothing: To fix jittery robot motion, in some cases
- Swap X for Y: In case you have your Motor X wired as Motor Y and vice versa

- Manual paint-- May enable experimental advanced-level painting options, for the adventurous.
- Open last image on startup: Or, start with a blank canvas every time.

The API server. RoboPaint contains an API server that lets you write your own software to control the WaterColorBot. You can also enable the API to accept remote connections (if you know what you're doing) to allow your WaterColorBot to be controlled by remote devices on the network.
Modes Tab[edit]
The modes tab controls which modes are shown on the opening screen of RoboPaint. The default setting has Spiral Paint, SVG Editor, and Automatic Print Mode displayed on the opening screen.
Troubleshooting[edit]
In case of difficulty, please begin at our troubleshooting page.
Known issues (specific to RoboPaint)[edit]
Drawing imprecision with a pen or pencil[edit]
If RoboPaint seems unable to match the fine detail that you expect with a pen drawing-- it is "randomly lifting the pen" when you don't expect it to, it may be helpful to turn off occlusion checking.
Go to Settings > Advanced > Modes: Manual, activate that, then go to manual mode, and uncheck "Check stroke visibility". This will completely turn off any special occlusion checking (with the exception of fills) just for this mode, and should quiet down your drawing quite a bit. You'll find the Auto Paint button (under the Auto tab) works basically the same as it does in regular print mode.
Error upon launch: USB conflict (Windows 8)[edit]
RoboPaint has a known issue under Windows 8 that can produce give a "code 80020005" error if certain types of devices are connected to your computer by USB instead of (or in addition to) the WaterColorBot. We consider this to be a "critical" issue, and are working hard on a solution.
If you encounter this error, please remove any non-essential USB devices from your system and try again. (Yes, your keyboard and mouse are essential!)
For Developers[edit]
Repository[edit]
RoboPaint is maintained at our github repository.
Bugs and feature requests[edit]
Please use the issues page at our repository to report bugs and request new features for RoboPaint.